
If you need to remove white noise from your audio recordings, you have three main tools:
- Get a cleaner recording, avoiding white noise before it ever makes it to your track
- Use a noise gate plugin, reducing the volume of all noise that isn’t intended to be in the recording
- Use an EQ plugin, reducing the volume of unwanted frequencies
These three techniques can eliminate all unwanted white noise in your audio. So let’s dig in a bit to each one.
Home Recording Studios
Modern technology has blessed (or cursed depending on who you ask) us with the option of doing more ourselves that was ever possible in the past. The the world of music is no exception. Before getting a good recording of your music was only possible by going into a studio which would be an expensive procedure for a struggling band or artists trying to make their name.
The advent of the DAW (digital audio workspace) changed everything for the home musician. What was once only in the reach of the professionals has become available to just about everyone with access to a computer. The plus side of this is that greater artistic options are available to the home recording musician.
The downside is that everything got a whole lot more complicated! Whereas once a guitarist would just play the guitar and leave the rest to the sound technicians, audio engineers, mixing and mastering engineers, etc now you have to learn everything yourself. By now history should have taught us that freedom doesn’t come cheap!
But for the adventurous and pioneering few who want control of all their artistic output, there are plenty of resources online to help you learn. I’ve learnt this the hard way myself. I’ve played music my whole life and when I recently decided to try and learn production I quickly realized it was another ball game altogether.
I pictured it was as simple as plugging in and playing right and the rest would fall into place. Anyone who’s into music production knows this is far from the case. One thing I struggled with is how to remove white noise from field recordings I wanted to include in some ambient tracks.
What Is White Noise?
White noise is any sound that appears in your audio that shouldn’t be there. This could be anything from people talking or moving around, traffic, or the buzzing of faulty wires. White noise is any noise that is in your recording that you didn’t intend to be there.
It can be tricky to remove, but read on for tips and tricks on how to do this with the least amount of pain possible!
1. Get a Cleaner Recording
As with everything, the best medicine is always prevention. When recording audio, the setup is just as (if not more) important than the software you’re using. As obvious as it is, recording in the best environment you can will eliminate the likelihood of any sound pollution entering your track. The cleaner the sound recording is, the crisper the sound will be on your final track.
Our modern lives are filled with modern conveniences that are constantly humming and vibrating, such as fridges, fans, air conditioning and phones. That’s not even mentioning sounds that can come from the outside, especially if you live in an urban environment.
The ideal setup
You want to make sure your signal strength is as strong as possible without any clipping (waveform distortion.) Signal to noise ratio is the measurement of the strength of what you’re recording in relation to the background noise. If you’re recording an instrument or your voice, getting a strong signal will be a simple as being as close to the microphone as you can get without any distortion.
Using headphones helps you understand that sounds that are around in the room better.
But, as anyone alive long enough will know, everything doesn’t always go to plan. Sometimes you nail your recording, only to listen back and realize there’s a whole lot of noise in there that you didn’t want. But before you bin the entire session and start again, there’s a few things you can do.
You don’t necessarily need a professional recording studio to get the best audio possible, but you will need to choose the most silent and best-suited room for your recording. After you’ve chosen the best area available to you, you’ll want to familiarize yourself with any ambient noise in the area.
Recording your room tone
When you’ve noted the ambient noises that affect your recording space (they could be florescent lights humming, friends or colleagues, dogs barking or whatever) you’ll want to do a test recording of your room.
This is what’s known as recording your room tone. Record 10-20 seconds of the natural noise in the room. You’ll want to use the same microphone you’ll be using to record your voice or instrument just before you intend to record. This is to give yourself an idea of the ambient noises you’ll be dealing with.
Once you’ve done your recording, listen back to it with headphones to see what you can easily eliminate. If you can hear the hum and rumble of a fan or heater or cooler then consider turning it off whilst you record. The same goes for any noisy light fixtures. If you can hear anyone’s conversation then tell them (politely if possible) to get lost.
Your room tone recording will also help you to reduce any white noise after you’ve recorded your session. You can do this by using your room tone recording as a baseline for your audio software of choice to remove white noise.
Reducing audio noise
There are several different free audio editing softwares out there. However, to be able to use the majority of them, you’ll find you may need to have some basic audio editing knowledge under your belt.
2. Use a Noise Gate Plugin
As has already been mentioned, prevention is the best medicine. Many times people believe that any problem can be fixed in post-production by some magic button, technique or plugin. Whilst many things can be done in post-production, it’s worth remembering that not everything can be magically fixed this way.
Let’s take a closer look at some of the post-production techniques you can follow if after all your best efforts you still find there’s some unwanted noise in your recording. But fret not, it happens.
The noise gate
A noise gate is a plug-in you use to eliminate (or reduce) white noise in your recorded audio. Many DAW’s come with some form of white noise reduction in them, but you can always download one if you don’t have access to one already.
On a Noise Gate plugin, all you have to do is set up a few simple parameters and you can remove unwanted background noise and thus keep the desired focal points of your audio highlighted. Sounds easy enough right?
A noise gate eliminates any sound below a certain volume level. If the undesirable noise volume is lower than the sound you want to keep, then a noise gate plugin will solve this problem for you. This is possible because background noise is generally quieter than the main sound you are trying to capture.
A noise gate can help you further remove noise from the focal part of your recording by adjusting certain parameters.
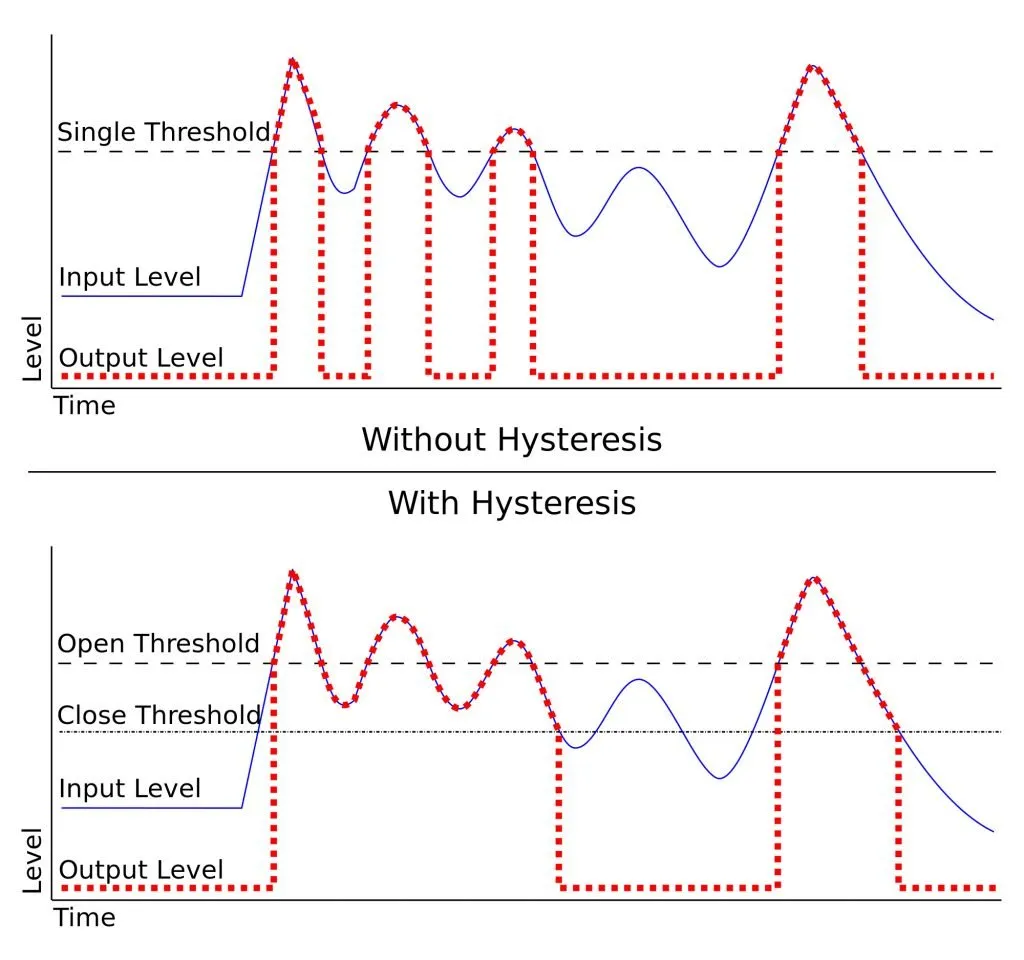
The above image shows two examples of how a noise gate can change the audio in a recording. The blue lines are the original recording and the red dotted lines are the final product after applying the noise gate.
What are the parameters of a typical noise gate plugin?
Some of the most common parameters you’ll find on most noise gate plugins are:
Threshold: This is the level at which the noise gate lets sound through. Audio must exceed this level in order for it to be heard.
Return: This sets the difference between the threshold level that opens the gate and the levels that close it.
Focus: The focus drop down will allow you to select what kind of sound frequencies you want to filter out. What you select will depend on the type of noise you are wanting to filter out. For example, if there’s a low rumbling sound you may want to filter out lower frequencies. If your problem is a hissing sound then you’d want to fade out some higher frequencies.
Floor: This is the amount the audio signal is reduced each time the gate is closed.
Attack: This is the amount of time it will take for the gate to open after the threshold is reached.
Hold: The amount of time the gate will remain open after the noise has fallen below the signal threshold.
Release: The time it takes for the audio signal to reach 0db once the signal has dropped below the threshold.
Things To Look Out For
Some plugins might have a processing slider that will let you control how much noise to remove. Whilst it may be tempting to remove all the noise, it’s worth noting that doing so may make your voice sound somewhat muddy and possibly unnatural.
If you find this is the case, then try applying just the right amount of noise reduction that also allows your recording to still sound natural and organic (if that’s what you’re after.)
Adjusting the gate parameters
Make sure you adjust the gate parameters when you begin. Ensure that the ‘floor,’ knob, and the ‘return,’ knob are set to 0.00dB. This is to ensure that your recording drops to 0dB whenever it’s below the threshold.
Make sure the ‘Threshold,’ sits directly above the level of the background noise. This is to ensure that no background noise inadvertently passes through the gate. Doing so allows all the audio you want to be heard to pass through the gate, with the unwanted levels being unable to pass.
You can think of this feature as akin to bouncers at a nightclub checking ID (if you like.)
One downside of this is that sounds vary in level, whether the source is a human voice or any other instrument. Sometimes sounds you want to get through the sound gate and make it into your final recording get stuck behind the gate and end up cut out.
If you’re recording voice, then you may want to pay special attention to setting a ‘Release,’ time that allows your words to be heard and make sure they don’t blend into one another. This level can be adjusted according to your recording parameters, but often in between 50-150ms should be fine.
If, when you playback your clip you hear bits and pieces of your audio cutting off you may want to experiment with the ‘release,’ and ‘attack,’ controls. These controls affect how aggressive the noise gate is at keeping out unwanted visitors. Sometimes you find that some of the sounds you want are excluded, so it’s a question of playing around with the levels until you’re happy with them.
3. Use An Equalizer
An equalizer (EQ) allows you to block a specific frequency or range of frequencies. If the sounds you want to block out are at a specific frequency, then you can try setting an EQ to block out all the unwanted sounds.
Remember that a good and strong recording of the human voice will span nearly the whole spectrum of frequencies. If you block out unwanted noises at certain frequencies, you’ll also most likely end up blocking out parts of the human voice you probably want to keep.
To Sum Up
Getting a good recording is not always an easy task. Often you’ll think everything has gone well, only to find that your microphone has picked up a whole lot of things you didn’t want it to. Fortunately, there are things we can do to save the recording beforehand. As with everything, prevention is always the best medicine.
Prevention in this context involves making sure that your recording environment is as optimized as it’s humanly possible for you to make it. Be warned, this may involve you recording at strange times of the day or night! Make sure all outside noise is minimized insofar as it’s in your control to do.
If you’ve done everything in your power to minimize white noise in your recording and you still find it there, then there are some post-production techniques you can use on your DAW, such as a simple EQ or a Noise Gate plugin. Your DAW of choice should already come with one, but if not there are plenty of free ones for you to download.
Be prepared for a bit of a learning curve. With time, however, you should be able to keep the sounds you don’t want out of your recordings whilst optimizing the ones that you do.